Battle Rope training has been a pretty hot topic in the fitness world for the last few years. A once unique tool that caught people’s eye, today they are everywhere from Adidas ads to UFC highlight films.
My goal in this article to explain the basics, uncover some variables and show you some of the advanced techniques that we have been using at our gym over the last few years.
A few years back, I saw some videos on battle rope training, and it piqued my interest. I wondered if it was just another fad or gimmick.
Out of the blue, a trainer friend named Tony Bruno (gave me my first training job in Chicago), called me and asked if I had heard about the ropes. Apparently, he was helping Ingrid Marcum rehab from a lifting injury, and she had opened his eyes to the training concept.
Ingrid Marcum helps facilitate the Battle Ropes workshops and certifications with the founder, John Brookfield. You’ve probably seen or heard about John and his program in Perform Better, Youtube, Ironmind, and many other resources.
Tony is typically very skeptical about fitness gimmicks, but his enthusiasm gave me the confidence to buy and learn more about the system. I spoke briefly to Ingrid and eventually had she and John visit our gym.
We’ve hosted three certifications at our facility, and it has become a pillar of our training program.
Battle Rope Training Benefits
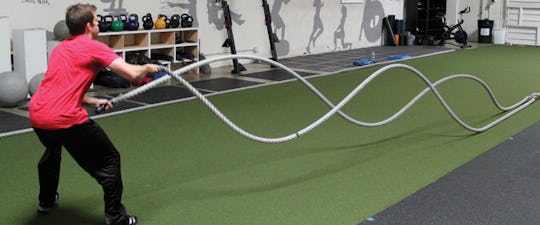
Learning to maintain intensity over time helps increase lactic acid threshold in your upper body. This is unique since the majority of conditioning these days focuses on locomotion, running, climbing, and other drills propelled by the legs.
This has helped us with our other lifts and activities outside the gym. It has also become one of our secret weapons when training MMA fighters. I expect each one of them to be able to maintain intensity on a variety of rope drills for at least 5 minutes.
They are fun. The majority of people that I talk to hate the gym and it’s not because they are lazy. Most people are seriously bored at the typical big box gym. There is no emotion and very little has changed over the last 30 years.
Using tools like the ropes is a breath of fresh air for most people; it creates excitement, it is unique, and it gets people “playing” again.
Developing mental toughness. I think that developing mental toughness and learning to overcome obstacles is one of the most important things we can help people do.
When people start using the ropes, the idea of maintaining intensity over 1 minute seems like a pipe dream, but consistent training will help them break through mental barriers and come out with a new outlook and confidence.
Unilateral dominance/imbalance – The waves tell a story. If you watch the movements carefully, you will notice that one side of your body may move differently than the other; It may generate a smaller wave, be more uncoordinated, etc.
The cool part about Rope Training is that over time, these differences go away. Slowly, you will notice your right and left sides start to balance out.
How to Use Battle Ropes
Relax – Learning to relax under stress is vital. Many people grip the ropes hard and tense up their bodies, leading to quick exhaustion. Grip the rope lightly, relax your arms, shoulders, torso, and even your face; you will be able to move faster and maintain intensity for longer periods of time.
Breathe – This goes hand and hand with being able to relax. Rope exercises are 100% output, meaning that there is no rest. Typical exercises in other training methods have a rest point, allowing for relaxation and consistent breathing patterns. Novices to Rope Training tend to hold their breath and hurt their performance. Try and match your movement with your breathing pattern; as speed and intensity increases, your breathing should too.
Whole Body Training – While most rope exercises are thought to be upper body movements, the entire body should be utilized to increase power and efficiency. The legs and hips play a critical role in generating power into and through the arms. This is important for all movements, especially sports and athletics. When doing the Waves, be conscious of your feet, legs, hips, and shoulders. Make sure to avoid standing too stiffly, and ensure that all areas of your body are active.
Battle Rope Training: The Wave Series
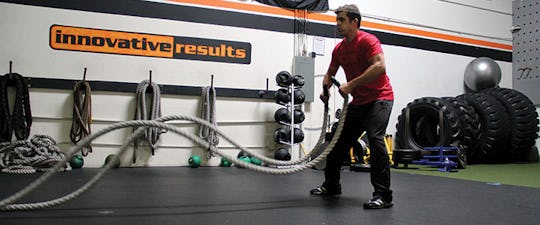
The Wave Series is typically what you see on Youtube, commercials, and advertisements. The most challenging aspect of the Wave Series is that, if done correctly, the exercises have zero downtime; Waves require 100% output.
These exercises can be used in a variety of ways, including various intervals for a particular time and/or for distance. A 50’ rope, wrapped around an anchor, makes 2, 25-foot lengths. You can use this information to design distance workouts (1/4 mile, 1 mile, etc.).
Time, distance, reps, etc. can all be manipulated to a variety of workouts and goals. Your imagination only limits the possibilities. Use the following variables to increase or decrease each exercise to fit your client’s ability levels and goals.
When trying the waves for the first time, 20 seconds will feel like an eternity. Over time, people quickly adapt and can maintain a consistent pace and intensity for 5 minutes to over 45 minutes. We have a wall full of names that did alternating waves for over 10 minutes.
I suggest working up to 10-20 minutes, then working on intensity and speed afterward.
Battle Rope Wave Exercise Variables
The Handle – Fold the rope over, and it doubles the size you have to hold, making it more challenging on the grip.
Distance from the Anchor – Ideally, you start with a little slack on the ropes. By moving closer to the anchor point, it makes it more challenging to get the waves to the end, meaning that you have to generate more power through the rope to get it all the way down.
Body Position – Standing, kneeling, sitting, plank position, and moving while doing various exercises adds a whole new list of drills. As you go from standing to kneeling, less of the body can work, and it becomes harder to get the waves to the end. Adding a variety of movements (squatting, lunging, jumping, lateral movement, and more) can make a basic movement very challenging.
Size of the Rope – Typically, we use a 50’ rope that is 1.5” thick for the wave series. They also have 2” ropes available, but because of its added girth and weight, it is much more challenging.
Wave Size/Velocity/Pace – The size and speed of the waves can also be counted. This is no different than pacing yourself for kettlebell lifting or running. The faster you go, the harder and more intense it becomes. Try to maintain 120-150 alternating waves per minute and see how you fair.
Battle Rope Wave Exercises
Here are six wave exercises, each stressing the body in different ways, using different muscles.
1. Stage Coach
2. Alternating Waves
3. Outside Circles
4. In-Out
5. Sidewinder
6. Rainbows
Battle Rope Wave Challenges
Wave Challenge #1
100’ (1.5” rope) Tsunami Wave. Part one of this challenge is being able to generate enough power to get a wave down the rope to the anchor point. If you can do that, then see how long you can maintain waves to the anchor.
Wave Challenge #2
50’ (1.5”) Alternating Waves. A simple start is to keep the waves going to the anchor for 5 minutes. You don’t need to worry about speed or intensity, just keep the waves going to the end for 5 minutes.
Wave Challenge #3
Once you have completed Challenge 2, start working on increasing your pace (number of waves, per arm, per minute). See if you can maintain 140 waves per minute for 5 minutes straight.
The easiest way to do this is by counting one arm, then doubling the number (otherwise it is easy to lose track). Depending upon the goal or the sport, particular challenges can be designed and used for ongoing testing.
Battle Rope Wave Exercise Demonstration Video
Battle Rope Training: The Pull Series
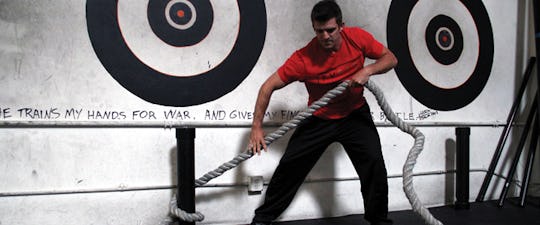
I rarely see anyone talk about these incredible drills. They are simple, efficient and truly humbling. Climbing ropes are regarded as the number way to develop hand and upper body strength. Unfortunately, not all of us have the space or ability to climb a rope. Some people need an alternative to building up foundational strength, want a safe alternative or simply want to have more variations to use.
The pull series offers another way to challenge your entire body. It is one of my favorite drills, and I use some variation of this at least once per week for myself and my clients. It is perfect for grapplers, but also very efficient for anyone looking to develop more upper body strength.
Rope Pull Exercises
Here are the basic 3 pulling exercises. Just like the Wave Series, there are quite a few variations that you can implement.
1. Facing Pull
2. Side Pull
3. Front Pull
Pull Exercise Variables
Body Position – Standing, Kneeling, Seated, Plank These positions don’t work for every pull mentioned, but do for most. As you attempt the various pulls, you will know right away which one works or not.
Size of the Rope – The size of the ropes is a huge component of these drills. The increased girth makes gripping the rope harder. For some of the testing we do, men use the 2” ropes, while women use the 1.5”. A larger rope also weighs down on itself when piled up, so you will feel some natural resistance during the pull.
Length of the Rope – Ideally, you will use a 100’ rope for all of the pulling exercises. Not only do you have to change less often, but the increased length also piles on itself as mentioned before. This type of resistance is inconsistent and forces you to overcome little bumps along the way.
# of Wraps – Varying the resistance is as simple as wrapping the rope around the pole more or less. One wrap is a good start, but you can add wraps as you see fit.
Time or Distance – We use the pulls in a variety of ways, including timed intervals, distances, and more. Just like the waves, you can determine distance very easily. Want to pull a mile? 53 lengths of a 100’ rope is about a mile.
Battle Rope Pull Challenges
Pull Challenge #1
Pull for distance. Try a simple seated pull over one shoulder for distance. Can you pull a quarter mile without stopping?
Pull Challenge #2
How many wraps can you pull? Adding two wraps can drastically increase the difficulty. Work to add more wraps and see what you can handle, but be careful. Ropes are much different than handles, so for an untrained hand, these can be tough. Start slow and maintain good posture.
Pull Challenge #3
Choose four different pulls and do each for a quarter mile, back to back. It will total one mile (53 lengths of 100’ rope). Try and complete the drill under one hour.
Battle Rope Pull Exercise Demonstration Video
Battle Rope Training: The Partner Series
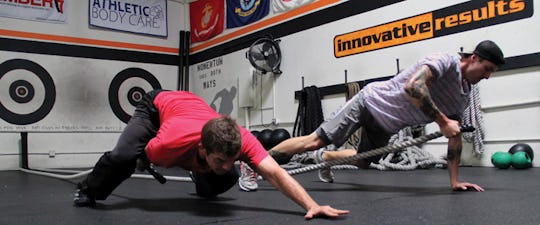
Some people prefer working out alone, but typically people’s performance improves when they have good workout partners. The ropes provide a lot of interesting exercises that can be used with groups, teams, or squads of people. Partner drills force you to not only overcome the friction or weight of the rope, but also the energy created by your partner. Simply holding the rope becomes much more challenging and a whole new feel from the solo exercises, plus it’s more competitive and fun.
Partner Rope Exercises
Here are a few of my favorites:
1. Plank Pull (forward)
2. Plank Pull (side)
3. Plank Pull (reverse)
4. Double-Rope Movement
5. Tsunami Battle
Battle Rope Partner Exercise Demonstration Video
Advanced Battle Rope Exercises
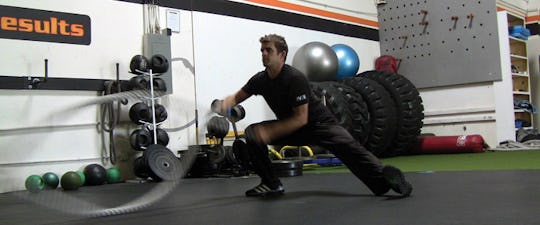
Once you’ve mastered the basics, you may be ready to move onto more advanced, challenging Battle Rope Exercises. If that’s the case, give these a shot.
Battle Rope Advanced Exercise Demonstration Video
A Beginner’s Guide to Battle Ropes

)


